Customizing the ListView
In the last post we created a basic Android project using Android Studio templates. While it’s great that we have a fully functioning master/detail style app, it does look a bit bare. In this post, we’ll change this by styling our list view, incorporating (sort of) real data to feed our list. We’ll make a custom adapter to drive our list with custom layouts, and introduce testing into the mix to ensure that our app continues to perform as expected.
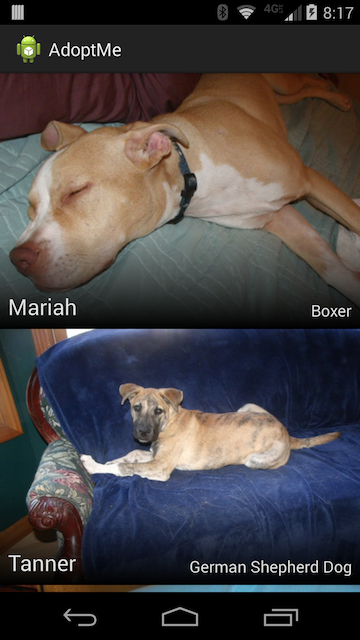
At the end of this post, this is how your pet list will look. I’ve made a few stylistic changes from the original mockups to allow the imagery to really fill the content area.
As always, now is the time to make a new feature branch:
$ git checkout -b list_style
Switched to a new branch 'list_style'
Add Test Library⌗
With any software project, it’s good to be able to run tests to ensure that your software works as intended and free of bugs. I’m, admitedly, relatively new to testing, but have found it quite helpful for Hashnote to raise my confidence in my software and ensure that bugs don’t creep in, especially ones I’ve already fixed that might come back.
Last year Google released Espresso, a functional testing framework that makes testing Android apps easy. Jake Wharton has converted Espresso into a Gradle based project, Double Espresso, to alleviate much of the headache of including it in your project.
We’ll be using Espresso for our testing, via Wharton’s gradle port, so we’ll need to add the dependencies. Open up your adoptme/build.gradle file and add instrumentTestCompile 'com.jakewharton.espresso:espresso:1.1-r2' to your dependencies section.
dependencies {
    compile 'com.android.support:support-v4:18.0.0'

    instrumentTestCompile 'com.jakewharton.espresso:espresso:1.1-r2'
}
This tells Gradle to include the Espresso library for the instrumentTestCompile build phase, but not the others. This means that it will be packaged with our app for testing but not production. We’ll be doing a slightly different version of this as we add libraries for other aspects of our app, but we’ll go into more detail about that later.
You also have to set the testInstrumentationRunner like so:
defaultConfig {
    minSdkVersion 14
    targetSdkVersion 19

    testInstrumentationRunner "com.google.android.apps.common.testing.testrunner.GoogleInstrumentationTestRunner"
}
That’s it for testing setup, now when we get into writing code for our app we’ll be all set to create tests to go along with it.
Add Sample Data⌗
When I’m working on apps that don’t have live data yet, like in our case, I like to add sample data in a separate module from the main code. That makes it easy to remove later, once web service calls are in place.
To do this, simply right click on the root of the project view, and select New > Module. Then select Android Library as the module type, and fill in the rest of the data like we did before.

This will add a new section in the project browser called sample. To here, add the sample data classes that I’ve created from here.
The sample data uses the Gson library to parse the sample JSON file, so you’ll need to add that dependency to your sample/build.gradle file.
dependencies {
    compile 'com.android.support:support-v4:18.0.0'
    compile 'com.google.code.gson:gson:2.2.4'
}
The last thing we have to do is add a dependency to our project. Open up the project build.gradle file, which you can find in the adoptme directory, and modify the dependencies closure to include compile project(':sample'). This tells gradle that our main project depends on the local sample project.
dependencies {
    compile 'com.android.support:support-v4:19.0.0'
    compile project(':sample')

    instrumentTestCompile 'com.jakewharton.espresso:espresso:1.1-r2'
}
This may seem like a lot of steps to go through just to include sample data, but it uses gradle to keep our sample classes segregated from the main app. That way, when we’re ready to implement real classes connecting with our web services, we just remove the sample module and we know we won’t have any legacy code left around.
What makes a dependency⌗
Let’s take a moment to dive a little deeper into these dependency lines. So far we’ve added three types of dependencies, build phase specific dependencies, remote dependencies, and local dependencies.
Remote dependencies⌗
First let’s examine the standard remote dependency line compile 'com.google.code.gson:gson:2.2.4'. Many libraries are available as Maven dependencies, and you can search the Central Repository here. If you search there for gson then click the latest version, you will see this:
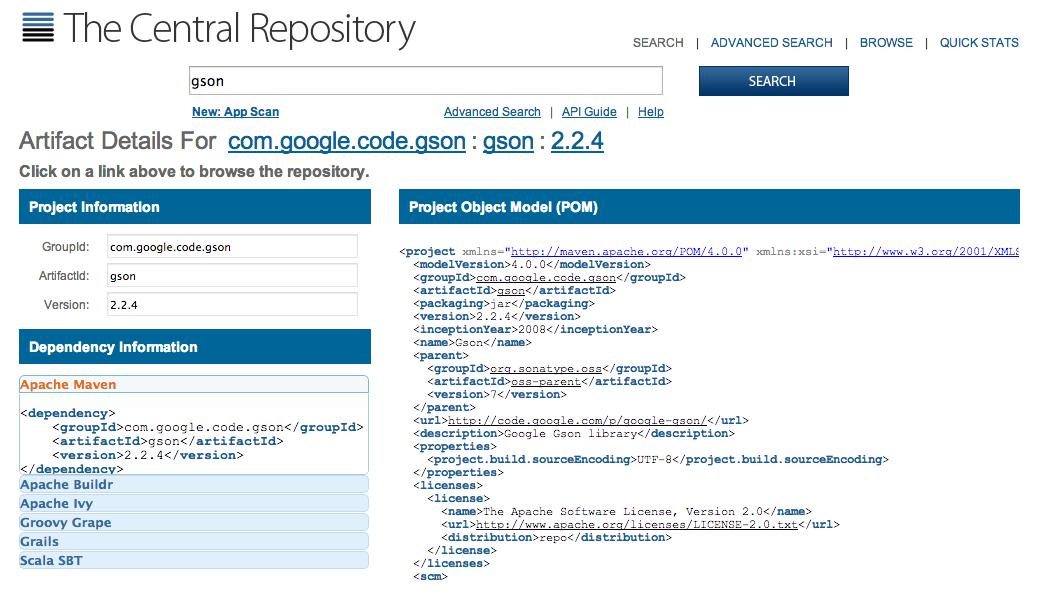
You’ll notice that the GroupId, ArtifactId and Version on the left align with the compile line in our build.gradle file. This is, in fact, where I got the correct information to include Gson in our project.
Local dependencies⌗
While Maven Central is host to many projects, there are some that either aren’t there yet, or shouldn’t be there. Our sample data module is a good example of this. Libraries like this are included as local dependencies with the line compile project(':sample').
That sure is easy, but you might be wondering how Gradle knows what :sample means. Open up the settings.gralde file in the root of our project to find out.
include ':adoptme', ':sample'
This one line tells Gradle what projects are included in the build. These are really just simple paths with : as a path separator.
So, for instance, if you wanted to include a library project who’s library was stored at libraries/action-bar-sherlock/library, you would add ':libraries:action-bar-sherlock:library' to this string and include it with compile project(':libraries:action-bar-sherlock:library') in your build.gradle file.
Build phase specific dependencies⌗
Sometimes you have a library that you only need for testing, as is the case with Espresso. This is done by replacing compile in the dependency line with the name of the build phase, such as instrumentTestCompile. This tells gradle to include that dependency when it compiles the instrumentTest phase of the build.
For more information about dependencies, read the Android Build System User Guide.
Create an Adapter⌗
Now it’s time for the fun part, making Android dance. We’ll start out by creating an Adapter to drive our ListView.
Since mobile devices have limited memory, it would be extremely innefficient to build all of the views that go in a ListView at once, then store them all in memory as the user scrolls through them. Imagine how much memory it would take to store your entire Gmail inbox in memory at once. This is where Adapters come into play.
An Adapter is an interface between an AdapterView (like ListView, GridView, Spinner, etc) and the underlying code. Effectively it’s a View factory that knows how to create a View for each item in a list, and does so on command.
As you scroll through a list, the ListView only keeps the views it needs to display in memory. When it is ready to display a new item on the screen, it requests that View from the Adapter, which builds the appropriate view based on it’s position in the list.
When an item is no longer being displayed in a list, that View is ‘recycled’, or sent back to the adapter so that it can simple modify values in the View instead of creating an entirely new View from scratch.
Start out by creating an Adapter for our Pet list (I put mine in the com.ryanharter.adoptme.adapter package).
public class PetsAdapter extends ArrayAdapter<Pet> {

    public PetsAdapter(Context context, List<Pet> objects) {
        super(context, 0, objects);
    }

    @Override
    public View getView(int position, View convertView, ViewGroup parent) {
        return super.getView(position, convertView, parent);
    }
}
Notice that we are actually using a concrete implementation of Adapter, ArrayAdapter, configured to store and serve Pet objects. ArrayAdapter takes care of much of the legwork for us.
Create the adapter test⌗
Before we get into any more code in our adapter, let’s create our first test.
Android Studio makes creating Test classes really easy. Anywhere in the contents of the PetsAdapter class, press command-shift-T and you will be presented with a dialog allowing you to create a new test.
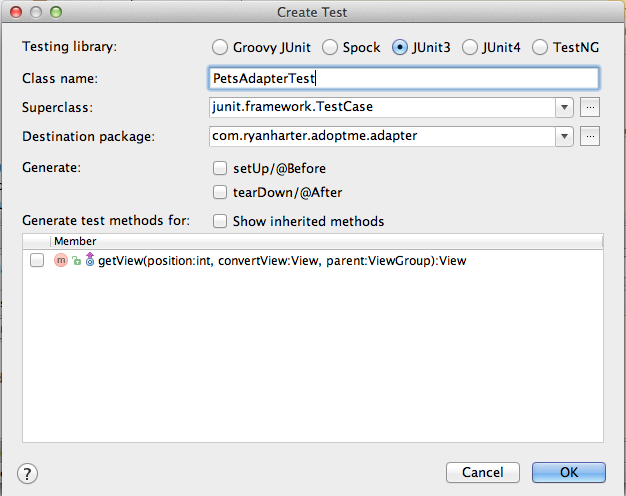
Set your testing library to JUnit3 (Android’s testing tools still run version 3), and check the box to generate a setUp method. Then create your test class.
In this test class we will be testing to make sure that our Adapter is returning the correct Views. To start, let’s just make sure it returns the correct count. Update your PetsAdapterTest class to look like this.
public class PetsAdapterTest extends InstrumentationTestCase {

    Context mContext;
    PetsAdapter mAdapter;
    List<Pet> mPets;

    public void setUp() throws Exception {
        super.setUp();

        mContext = getInstrumentation().getTargetContext();
        mPets = SampleDataUtils.getSamplePets(mContext);
        mAdapter = new PetsAdapter(mContext, mPets);
    }

    public void testGetCount_returnsCorrectCount() {
        int expected = mPets.size();
        int actual = mAdapter.getCount();

        assertEquals(expected, actual);
    }
}
Let’s go through this file piece by piece. First of all, notice that I changed the base class to InstrumentationTestCase. This is an Android specific addition which adds support for things like target contexts and resources.
The setUp() method is going to be called every time a test method is run, to configure the appropriate items in a clean manner. In this case, we’re going to fetch our sample Pet data from our SampleDataUtils, then construct the adapter we wish to test with those Pets.
The next method, testGetCount_returnsCorrectCount() is our first actual test method. JUnit 3 identifies test methods as public methods starting with test. I’m not sure what the actual convention is, but I like to name my methods with the format testMethod_behavior, where Method is the method on the target that I’m testing, and behavior is the action that the test verifies. For this simple test that might seem like overkill, bit it scales well to more complex tests, as we’ll see later.
In this simple test, we just call the getCount() method on the adapter and ensure that it returns the expected number of items.
Running the tests⌗
What good is a test if you don’t run it. You could run these tests from the command line, as I often do, with the command ./gradlew cIT, but Android Studio also offers some very helpful ways to run arbitrary gradle tasks.
Click on the Gradle tab on the right edge of your Android Studio window and you’ll be presented with a list of available Gradle tasks.
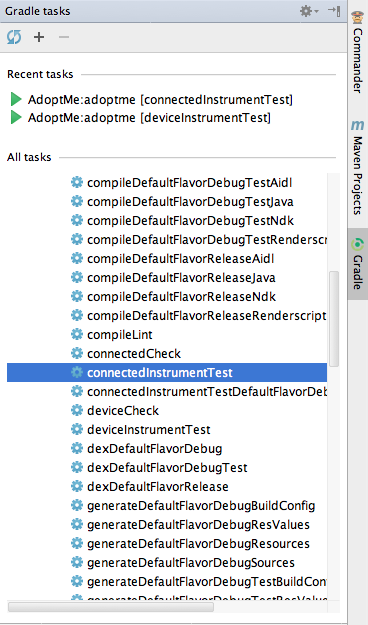
Expand AdoptMe and adoptme here and find the task titled connectedInstrumentTest. This will run our instrument tests on all devices currently connected. Double click this and you will notice your run bar changes to show the connectedInstrumentTest target and your tests are run.

From now on, whenever you want to run your tests, just click the Run button with the connectedInstrumentTest configuration selected. Use the drop down to select AdoptMe to run your app normally.
Your test should complete successfully, since ArrayAdapter takes care of much of the work of our Adapter for us.
Add the layout⌗
After all of this you’re probably thinking, “Hey Ryan, I’ve done all this and I still don’t have a cool looking list view!” I hear you, we’ll get to that now.
Create the layout⌗
We’ll start out by creating our layout in XML. I would normally write a test first, but in order to access fields by id in a test, we need the XML in place to create the id.
Create a new layout file by right clicking on the res/layout directory and selecting New > Layout Resource File. My convention is to name all layouts for list items with a row_ prefix, so I named this one row_pet.xml. Here’s the contents for our file.
<?xml version="1.0" encoding="utf-8"?>
<RelativeLayout xmlns:android="http://schemas.android.com/apk/res/android"
                xmlns:tools="http://schemas.android.com/tools"
                android:layout_width="match_parent"
                android:layout_height="wrap_content">

    <ImageView
        android:id="@+id/image"
        android:layout_width="match_parent"
        android:layout_height="@dimen/pet_list_photo_height"
        android:scaleType="centerCrop"/>

    <RelativeLayout
        android:layout_width="match_parent"
        android:layout_height="96dp"
        android:layout_alignBottom="@id/image"
        android:padding="8dp"
        android:background="@drawable/bg_pet_text">

        <TextView
            android:id="@+id/breed"
            android:layout_width="wrap_content"
            android:layout_height="wrap_content"
            android:layout_alignParentRight="true"
            android:layout_alignParentBottom="true"
            tools:text="Golden Retriever"
            style="@style/PetList.Breed"/>

        <TextView
            android:id="@+id/name"
            android:layout_width="wrap_content"
            android:layout_height="wrap_content"
            android:layout_alignParentLeft="true"
            android:layout_alignParentBottom="true"
            android:layout_toLeftOf="@id/breed"
            tools:text="Cody"
            style="@style/PetList.Name"/>

    </RelativeLayout>

</RelativeLayout>
You’ll notice a few red lines since we’re referencing resources that don’t yet exist, so lets fix that first.
If you put the insertion point in the red part of the @dimen/pet_list_photo_height line, you will notice a little red light bulb appear to the left of that line. Clicking that light bulb (or hitting option-return on Mac) will give you the option to create the appropriate dimension resource for this. Click that and set the value to 256dp.
This is a common practice on Android, and allows you to externalize your values so that they can be different on different platforms. Perhaps on tablets we’ll want this to be 512dp.
Do the same thing for the @drawable/bg_pet_text line, only this time we’ll create a drawable xml resource file. This will be the gradient background for our text protection. Here are the contents of the file:
<?xml version="1.0" encoding="utf-8"?>
<shape xmlns:android="http://schemas.android.com/apk/res/android">

    <gradient
        android:angle="90"
        android:startColor="@android:color/black"
        android:endColor="@android:color/transparent" />

</shape>
Moving on to the two style resources, create those and just leave the content field empty. Then, with the insertion point in one of the resources, hit command-B and you’ll be taken to that resource declaration.
These style resources allow the same sort of value extraction, and allow us to easily inherit from Android’s built in styles. Heres the code.
<style name="PetList.Name" parent="android:TextAppearance.Holo.Large.Inverse">
    <item name="android:textColor">@color/pet_list_text</item>
    <item name="android:singleLine">true</item>
    <item name="android:ellipsize">end</item>
</style>
<style name="PetList.Breed" parent="android:TextAppearance.Holo.Inverse">
    <item name="android:textColor">@color/pet_list_text</item>
    <item name="android:singleLine">true</item>
</style>
Create these color resources with the value #e5e5e5.
If you now go back to your row_pet.xml file, you should be free of red lines and see a preview of the row layout to the right of the editor.
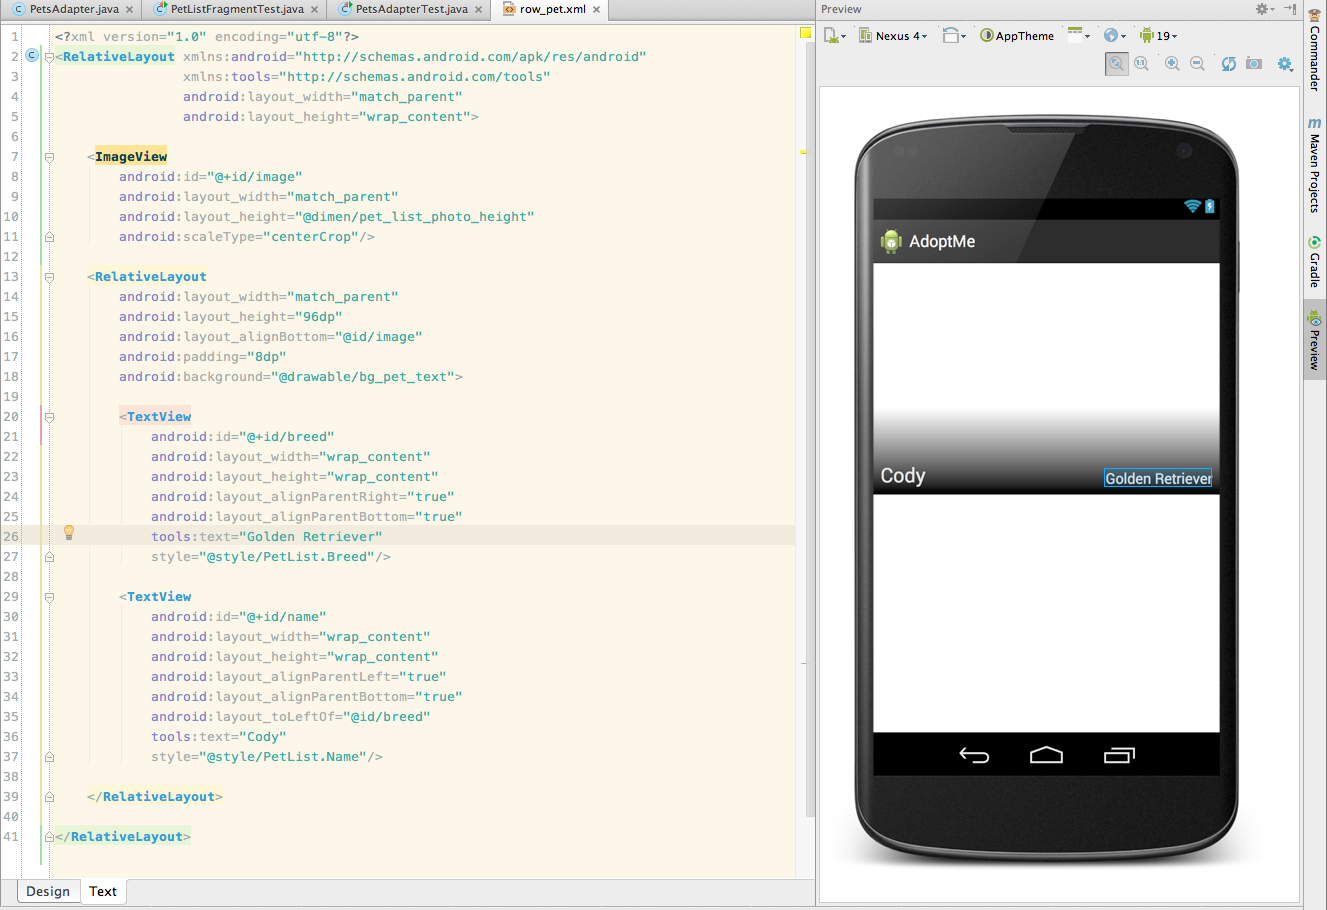
Notice that the text that I put in the layout has a tools: prefix as opposed to the android: prefix. This means that this attribute won’t be included in the production build, but allows the preview window to show it.
Write a test to verify the name⌗
That’s right, another test. In the TDD fashion we’re going to write our tests first, watch them fail, and then make them succeed. This flow was described to me as “Red, Green, Refactor”, saying that you see the test fail to ensure the test is doing something right (red), then you make it succeed by implementing the code (green), then you go through your code and make it nicer (refactor).
We want to test that our Adapter returns views with the correct pet name, so we can do that like so.
public void testGetView_showsPetName() throws Exception {
    String actualName = mPets.get(0).name;

    View v = mAdapter.getView(0, null, new FrameLayout(mContext));
    TextView name = (TextView) v.findViewById(R.id.name);

    assertEquals(actualName, name.getText());
}

public void testGetView_showsPetBreed() throws Exception {
    String actualBreed = mPets.get(0).breeds.get(0);

    View v = mAdapter.getView(0, null, new FrameLayout(mContext));
    TextView breed = (TextView) v.findViewById(R.id.breed);

    assertEquals(actualBreed, breed.getText());
}
In this test we call the getView method of the adapter to get a view for the first pet in the array. We then find the TextView with an id of name and check that the text matches the actual name of the pet.
We do the exact same thing for the breed, which is also displayed on the row.
You’ll notice that I am passing in a new FrameLayout as the parent of the view, which seems a little odd here. This is because we need to pass something in, but what isn’t particularly important, since it’s only used in the adapter to help with view inflation.
Create the view⌗
Now that we have a failing test, we can adjust our adapter to make the test pass. We’ll do that by implementing the getView method.
public class PetsAdapter extends ArrayAdapter<Pet> {

    private LayoutInflater mLayoutInflater;

    public PetsAdapter(Context context, List<Pet> objects) {
        super(context, 0, objects);
        mLayoutInflater = LayoutInflater.from(context);
    }

    @Override
    public View getView(int position, View convertView, ViewGroup parent) {
        View v = convertView;
        ViewHolder holder = null;
        if (v == null) {
            v = mLayoutInflater.inflate(R.layout.row_pet, parent, false);
            holder = new ViewHolder();

            holder.image = (ImageView) v.findViewById(R.id.image);
            holder.name = (TextView) v.findViewById(R.id.name);
            holder.breed = (TextView) v.findViewById(R.id.breed);

            v.setTag(holder);
        } else {
            holder = (ViewHolder) v.getTag();
        }

        final Pet pet = getItem(position);

        Picasso.with(getContext()).load(pet.photos.get(0).url).into(holder.image);

        holder.name.setText(pet.name);
        holder.breed.setText(pet.breeds.get(0));

        return v;
    }

    class ViewHolder {
        ImageView image;
        TextView name;
        TextView breed;
    }
}
The first thing that I’ve done is add a member variable for our LayoutInflater. We’ll be using the LayoutInflater to inflate our views, and don’t want to have to fetch it from the system each time, so this allows us to just get it once.
The next thing to notice is the ViewHolder class that I’ve created. This is a standard pattern in Android an allows our list scroll smoothly, since findViewById calls can be expensive. You can read more about the ViewHolder pattern here. In our case, the ViewHolder will hold a reference to the ImageView and both TextViews.
Now onto the getView method. To start out we make a copy of the convertView parameter that was passed in (just for clarity) and check to see if it’s null. If so, we inflate a new row_pet and set up our ViewHolder.
If the convertView wasn’t null, then all we have to do is get the ViewHolder that we previously set as a tag on the view. This is where the view recycling that I was talking about earlier comes into play, since the ListView doesn’t need this view anymore, we can reuse it by changing values instead of inflating an entirely new view.
That bit of code we just reviewed, the View inflation and ViewHolder setup block, is standard code that will likely be at the beginning of all of your Adapter.getView methods.
Moving on, we find the pet that this row is expected to represent by calling the Adapter’s getItem method.
Next up we have a call to a library that we haven’t yet included. Picasso is an excellent library that makes loading images, particularly from URLs in Lists, super easy and takes care of things like cancelling network requests when views are recycled for you.
To use this library you need to add a compile dependency to your /adoptme/build.gradle/ file.
compile 'com.squareup.picasso:picasso:2.2.0'
In order for the Picasso library to fetch images from the internet, we have to enable internet permissions on the app. You can easily do that with one line in the manifest.
<uses-permission android:name="android.permission.INTERNET" />
After loading the image the last piece is just setting the pet’s name and breed on the TextView’s we collected earlier.
Now, if you run your tests again, you should find that the tests pass, as our new view has the appropriate name and breed listed in the appropriate TextViews.
Using the adapter⌗
The last piece to get this to affect our ListView is to set our new PetsAdapter as the ListView’s adapter. We can easily do this by modifying the onCreate method of the PetListFragment.
@Override
public void onCreate(Bundle savedInstanceState) {
    super.onCreate(savedInstanceState);

    // TODO: replace with a real list adapter.
    setListAdapter(new PetsAdapter(
            getActivity(),
            SampleDataUtils.getSamplePets(getActivity())));
}
Now, if you run your app (don’t forget to change the Run Configuration back to AdoptMe), you should see your beautifully styled list view showing sample dogs.
Committing our changes⌗
The last step in any feature is committing our changes, and merging them back into the master branch.
rharter@Ryans-MacBook-Pro ~/code/AdoptMe $ git commit -a -m 'Adds styled pet list rows.'
...
rharter@Ryans-MacBook-Pro ~/code/AdoptMe $ git checkout master
Switched to branch 'master'
rharter@Ryans-MacBook-Pro ~/code/AdoptMe $ git merge step_2
Updating 8f90206..d536b05
Fast-forward
 ...Removed for brevity
Conclusion⌗
In this article, we went through much of the mundane setup of the testing framework (don’t worry, we won’t do that every time), created a custom layout for each row of our Pet list, and created a custom Adapter to configure our rows with the appropriate Pet. We did all of this in a TDD fashion, allowing us to verify our code later to ensure that no bugs have crept in.
You can check out my code at this point on Github on the step_2 branch and, as always, leave some comments if you have any comments or questions, and to share your progress.