Building Dynamic Custom Views
Last week I released Fragment for Android. Fragment is made up of all sorts of custom Views, which I think sets it apart from many apps in the Play Store.
Some of these views have a similar pattern to views I’ve had to create for other apps, in which a scroll view has padding such that every item within it can be scrolled to the center of the view. On it’s surface this doesn’t seem complex, but when you consider the massive difference in screen sizes available on Android, things get a little more complicated.
The Control⌗
Let’s start by defining our end goal. The control we want to build allows the user to scroll a view such that any of the contents can be moved to the center of the screen. Here’s an animation demonstrating what I mean.
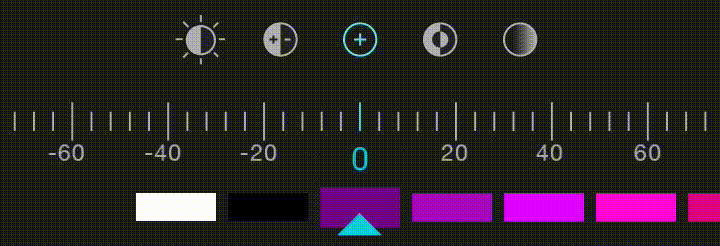
This control, boiled down, is really just a HorizontalScrollView. Notice how, when the user scrolls to the end, there is a nice overscroll indicator. When the user flings the control, it moves accordingly. The control nicely decelerates just like all other Android ScrollViews, making it feel natural to the user. These are all things you get for free by subclassing a build in Android widget.
This view does, however, pose two challenges. First, the ScrollView needs to be observable, so we can update our value whenever the user scrolls the view. Second, we need enough padding on each side of the view so that the contents will scroll such that the edges align with the center of the screen. Let’s tackle these one at a time below.
An Observable ScrollView⌗
The first challenge, creating an observable ScrollView (Horizontal in our case), is actually quite simple. The orientation of the ScrollView isn’t important, so this will work with vertical or horizontal scroll views.
This is a surprisingly simple problem, and I’m always surprised when I’m reminded that this feature isn’t built into the default Android ScrollView class. ListView has a listener interface to be notified with the scroll position changes, so why not ScrollView. Let’s just assume that the AOSP developers figured it was too easy to be required.
While the built in ScrollView classes don’t have an OnScrollChangedListener interface, they do have a protected onScrollChanged method, so we can easily just subclass the ScrollView of our choosing and create our own interface. Here’s what mine looks like.
/**
 * A {@link HorizontalScrollView} with an {@link OnScrollChangedListener} interface
 * to notify listeners of scroll position changes.
 */
public class ObservableHorizontalScrollView extends HorizontalScrollView {

  /**
   * Interface definition for a callback to be invoked with the scroll
   * position changes.
   */
  public interface OnScrollChangedListener {
    /**
     * Called when the scroll position of <code>view</code> changes.
     *
     * @param view The view whose scroll position changed.
     * @param l Current horizontal scroll origin.
     * @param t Current vertical scroll origin.
     */
    void onScrollChanged(ObservableHorizontalScrollView view, int l, int t);
  }

  private OnScrollChangedListener mOnScrollChangedListener;

  public ObservableHorizontalScrollView(Context context, AttributeSet attrs) {
    super(context, attrs);
  }

  public void setOnScrollChangedListener(OnScrollChangedListener l) {
    mOnScrollChangedListener = l;
  }

  @Override protected void onScrollChanged(int l, int t, int oldl, int oldt) {
    super.onScrollChanged(l, t, oldl, oldt);
    if (mOnScrollChangedListener != null) {
      mOnScrollChangedListener.onScrollChanged(this, l, t);
    }
  }
}
As you can see, the only thing that I’ve added here is the OnScrollChangedListener interface, and called it when the ScrollView’s position changes. This is a super simple subclass that adds immense value to the built in ScrollView classes.
Here’s an example of how you might use this.
private OnScrollChangedListener mListener = new OnScrollChangedListener() {
  @Override public void onScrollChanged(ObservableHorizontalScrollView view, int l, int t) {
    // eg. 0.5 = 50 / 100;
    float value = (float) l / view.getMaxScrollAmount();

    // do something with value
  }
}
This simple solution gets us exactly what we want, and doesn’t take all that much effort to implement. Aside from the class name, I think it even fits very nicely in with the other Android API classes.
Where did I come up with this elegant solution, you ask? While I’ve pointed out several times that this is a very simple solution, the idea for how to approach the problem actually came from a piece of open source code that I saw a while back. This is why it pays to be involved in open source, even if it’s just diving through the code of others.
Dynamic Padding⌗
The other challenge that we identified when making this view was that the scrolling contents needs to be able to be in the center of the screen. The challenge here is that we don’t know the width of the screen at compile time, and can’t even get the width of the view until it is measured, so we need a dynamic way to add spacing around the scrolling content.
Below I will outline two approaches to this problem, but both solve the problem in the same fashion. The basic idea is to add invisible spacers before and after the scrolling content, sized appropriately so that that actual contents are able to scroll their left edge to the center of the scroll view.

As you can see in the diagram above, the ScrollView doesn’t need to do anything differently in relation to it’s scrolling, it just appears to allow items to scroll to the center to the user.
OnPreDrawListener⌗
One way we can achieve this is by using the ViewTreeObserver’s OnPreDrawListener. This is a super handy callback which is called before our views are drawn but after they have been measured. This allows us to modify our views (add spacers) once we know the size of the view. Here’s an example:
scrollView.getViewTreeObserver().addOnPreDrawListener(new OnPreDrawListener() {
  @Override public boolean onPreDraw() {
    // Be sure to remove the listener, or it will be called on every draw pass
    scrollView.getViewTreeObserver().removeOnPreDrawListener(this);

    LinearLayout child = (LinearLayout) scrollView.getChildAt(0);

    // Create LayoutParams for the spacers that are half the width of the ScrollView.
    int width = scrollView.getWidth();
    LinearLayout.LayoutParams p =
        new LinearLayout.LayoutParams(width / 2, LinearLayout.LayoutParams.MATCH_PARENT);

    // Add the left spacer (blank view)
    View leftSpacer = new View(getContext());
    leftSpacer.setLayoutParams(p);
    child.addView(leftSpacer, 0);

    // Add the right spacer (blank view);
    View rightSpacer = new View(getContext());
    rightSpacer.setLayoutParams(p);
    child.addView(rightSpacer);

    // Return false so that the View doesn't get drawn, and does a new layout pass with
    // our new spacer views.
    return false;
  }
});
This is a nice approach because it can be added onto any ScrollView in the code, without modifying your existing layouts (assuming the child of the ScrollView is a LinearLayout appropriately oriented). Throw this in a view helper and it can be as simple as ViewHelper.addScrollingSpacers(scrollView);.
One downside of this approach is that we actually throw away a measure-layout-draw cycle. Remember that our OnPreDrawListener is called at the end of this cycle so that we know the width of our ScrollView. That means that the first time around, this is really a measure-layout-add-spacers-measure-layout-draw cycle. At the end of the day, since this only happens once, it’s not generally a big deal, but it is something to note.
But what if there was a way to add our spacers earlier in the measure-layout-draw cycle?
onLayout⌗
As it would happen, there is. Since we want to modify the layout of the items, with a custom compound view we can make our adjustments during the layout cycle, meaning no wasted time. Here’s how we might accomplish that.
public class ScrollingValuePicker extends FrameLayout {

  private View mLeftSpacer;
  private View mRightSpacer;
  private ObservableHorizontalScrollView mScrollView;

  public ScrollingValuePicker(Context, context, AttributeSet attrs) {
    super(context, attrs);

    // Create our internal scroll view
    mScrollView = new ObservableHorizontalScrollView(context);
    mScrollView.setHorizontalScrollBarEnabled(false);
    addView(mScrollView);

    // Create a horizontal (by default) LinearLayout as our child container
    final LinearLayout container = new LinearLayout(context);
    mScrollView.addView(container);

    // Our actual content is an ImageView, but doesn't need to be
    final ImageView sliderBg = new ImageView(context);
    sliderBg.setImageResource(R.drawable.scrolling_slider_bg);
    sliderBg.setAdjustViewBounds(true);
    container.addView(sliderBg);

    // Create the left and right spacers, don't worry about their dimesnions, yet.
    mLeftSpacer = new View(context);
    container.addView(mLeftSpacer, 0);

    mRightSpacer = new View(context);
    container.addView(mRightSpacer);
  }

  @Override protected void onLayout(boolean changed, int l, int t, int r, int b) {
    super.onLayout(changed, l, t, r, b);

    if (changed) {
      // Layout the spacers now that we are measured
      final int width = getWidth();

      final ViewGroup.LayoutParams leftParams = mLeftSpacer.getLayoutParams();
      leftParams.width = width / 2;
      mLeftSpacer.setLayoutParams(leftParams);

      final ViewGroup.LayoutParams rightParams = mRightSpacer.getLayoutParams();
      rightParams.width = width / 2;
      mRightSpacer.setLayoutParams(rightParams);
    }
  }

  // do stuff with the scroll listener we created early to make our values usable.
}
In this example, you can see that our custom compound view is really the container of an ObservableHorizontalScrollView, and that it sets the spacer width whenever the layout changes, during the initial layout pass.
This approach also makes our view easily reusable via our XML layouts, like so:
<com.ryanharter.android.example.ScrollingValuePicker
  android:id="@+id/myScrollingValuePicker"
  android:layout_width="match_parent"
  android:layout_height="wrap_content" />
The End⌗
You now have a few different ways to create a custom view that will delight your users. Which one you choose is entirely up to you, but both can be extended to work with ListViews, or really any scrolling view to which you would like some extra space.
These techniques can be used for other effects, as well. For instance, in addition to using this for custom value selectors, I’ve used the same approach for things like parallax effects.
There’s just another couple of tools for your toolbelt. If you’ve done something similar to this, or have another approach, share it in the comments.