Cloud Build Recipes - Saving the Build Cache
When building development projects on your local workstation speed is important. A quick feedback cycle can mean the difference between a productive day of test driven development and a day filled with distraction. Your continuous integration environment is different.
Since CI is responsible for preventing bad code from being merged and creating production releases, most people value precision over speed. That’s why most CI environments utilise isolated build environments and always run all of the tests.
That doesn’t mean, however, that we shouldn’t optimize our CI builds for speed, just that we should always consider the tradeoffs we make for precision and reliability. Allowing our CI server to cache dependencies between builds allows it to build much faster, without sacrificing the reliability we’re after.
This post is part 3 in a series on setting up Google Cloud Build (GCB) for Android developers.
- Introducing Google Cloud Build
- Incrementing Build Numbers
- Saving the Build Cache
In this post we’ll be looking at two builders, save_cache and restore_cache, that make caching data between builds easy, speeding up your builds. They’re designed to compress and store cache files in Google Cloud Storage (GCS) so they’re accessible by any of your builds.
Installing the Builders⌗
Since GCB is designed to run docker images from your project’s Google Cloud Registry (GCR), before you can run the build steps mentioned here you’ll have to deploy them. This is a pretty simple process, and is detailed in the readme of the Pixite Android Builders repository.
After checking out the repository, simply run the gcloud builds command to build and deploy the save_cache and restore_cache builders.
gcloud builds submit ./save_cache/
gcloud builds submit ./restore_cache/
In order to use the builders you’ll also need a GCS bucket to store the cache files. If you don’t have one already, you can create one using the gsutil command.
gsutil mb gs://project-cache
Check out the gsutil documentation for more options to manage your bucket.
Restore the Cache⌗
Now that you’ve got the builders deployed we can start using them in our cloudbuild.yaml build script.
The first thing we need to do early in our build process is restore a cache, if one exists. We do this using the restore_cache build step that we deployed earlier. The restore_cache build step is quite simple, taking a bucket name, and a key.
- name: 'gcr.io/$PROJECT_ID/restore_cache'
  id: restore_cache
  waitFor: ['-']
  args:
  - '--bucket=gs://project-cache/'
  - '--key=gradle-$( checksum build.gradle )'
The key you choose is important here since you pay for what you store in Google Cloud Storage (GCS). It’s important that the cache key is tied to the files that define your cached items, like dependencies and gradle wrapper versions. As your project evolves and cached items change, you don’t want to be paying to store obsolete items in your cache.
The restore_cache builder has a helper command, checksum, that allow you to get the checksum of any file. Using this command to generate a cache key based on the build.gradle file means that you’ll generate a new cache file any time that file changes, allowing you to discard old cache files that include obsolete data.
When this build step runs it will attempt to download a cache file from the specified bucket and, if one exists, extract it to the local file system for use by other build steps.
Build the Project⌗
After the cache has been restored and our other setup steps have been completed, we can execute the build steps. These steps are dependent on your project needs, but usually involve building, testing and deploying your app.
Here is the build step from my project, Pigment.
- name: 'gcr.io/$PROJECT_ID/android:28-ndk-r17b'
  id: build
  args: ['./gradlew', '--stacktrace', '-Dtrace', ':app:assembleRelease', ':app:assembleDebug', 'assembleAndroidTest']
  <<: &env
    env:
    - 'TERM=dumb'
    - 'JAVA_TOOL_OPTIONS="-Xmx4g"'
    - 'GRADLE_USER_HOME=/workspace/.gradle'
    - 'GRADLE_OPTS="-Dorg.gradle.daemon=false -Dkotlin.incremental=false"'
    - 'BRANCH_NAME=$BRANCH_NAME'
  waitFor:
    - setup_env
    - restore_cache
    - decrypt_secrets
For this post, the important things to notice are the waitFor list and the env.
Since the build step can’t execute until after we’ve completed our setup, including restoring the build cache, you’ll notice that the restore_cache id that we defined earlier is listed in the waitFor block of the step. This tells GCB to execute this build step only after the restore_cache step, among others, has completed.
As for the env, we set the GRADLE_USER_HOME environment variable to /workspace/.gradle. This ensures that the Gradle home is stored in a location, /workspace/, which is retained between build steps. Alternatively we could add a volumes block to define a folder to be shared between steps, but this provides a much cleaner build script.
Save the Cache⌗
Once our app has been built and tested and new files have been added or updated in the cache, the final step is to save the cache to the GCS bucket for the next build. This is easy with the save_cache step, which is almost identical to the restore_cache step we used before, but adds a repeatable --path argument that allows us to define what file paths will be cached.
For Android builds the main things to cache are the Gradle wrapper, which doesn’t need to be downloaded each time, and the Gradle caches, which contain the dependencies that were downloaded from maven repositories.
- name: 'gcr.io/$PROJECT_ID/save_cache'
  args:
  - '--bucket=gs://project-cache'
  - '--key=gradle-$( checksum build.gradle )'
  - '--path=.gradle/wrapper'
  - '--path=.gradle/caches'
  waitFor:
  - build
It’s important to use the same key and bucket here as in the save_cache step so that the saved cache is restored in future steps.
The Build Script So Far⌗
To give you an idea of how these build steps fit into the larger cloudbuild.yaml build script, here is what we’ve got so far.
This uses an updated and simplified buildnum step that I’ll detail in an updated post.
steps:

- name: 'gcr.io/$PROJECT_ID/buildnum:1.0'
  id: setup_env
  waitFor: ['-'] # Begin immediately
  args: ['gs://${_CONFIG_BUCKET}/buildnum']

- name: 'gcr.io/$PROJECT_ID/restore_cache:1.0'
  id: restore_cache
  waitFor: ['-']
  args:
  - '--bucket=gs://${_CACHE_BUCKET}'
  - '--key=build-cache-$( checksum build.gradle )-$( checksum cloudbuild.yaml )'

... other setup

# Build the project
- name: 'gcr.io/$PROJECT_ID/android:28-ndk-r17b'
  id: build
  args: ['./gradlew', '--stacktrace', '-Dtrace', ':app:assembleRelease', ':app:assembleDebug', 'assembleAndroidTest']
  <<: &env
    env:
    - 'TERM=dumb'
    - 'JAVA_TOOL_OPTIONS="-Xmx4g"'
    - 'GRADLE_USER_HOME=/workspace/.gradle'
    - 'GRADLE_OPTS="-Dorg.gradle.daemon=false -Dkotlin.incremental=false"'
    - 'BRANCH_NAME=$BRANCH_NAME'
  waitFor:
    - setup_env
    - restore_cache
    - decrypt_secrets

... other verification steps

- name: 'gcr.io/$PROJECT_ID/save_cache:1.0'
  waitFor:
  - build
  - verify
  args:
  - '--bucket=gs://${_CACHE_BUCKET}'
  - '--key=build-cache-$( checksum build.gradle )-$( checksum cloudbuild.yaml )'
  - '--path=.gradle/caches'
  - '--path=.gradle/wrapper'

substitutions:
  _CACHE_BUCKET: project-build-cache
  _CONFIG_BUCKET: project-build-config
Clean Up⌗
As I mentioned before, it’s helpful to update the cache key as your dependencies change to ensure you’re not paying to store obsolete cache files. Updating the key based on the checksum of the files that define your dependencies is only one step of that, you also need to remove old cache files from your GCS bucket periodically to really see the improvement there. Fortunately GCS offers some bucket policies to automate this.
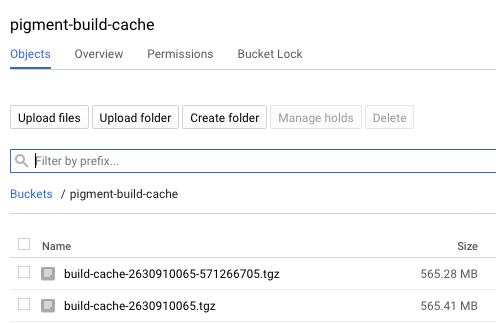
If you navigate to your cache bucket in a browser you’ll see the cache files that have been saved. The tarball files here are named based on the cache key that you set in the save_cache build step. As you can see, I’ve updated the cache key and now have two cache files, using an extra 500 MB of storage. Over time this can start to add up.
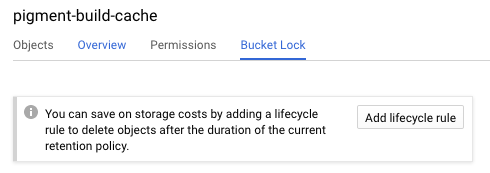
By clicking on the “Bucket Lock” tab, you will see an option to add Lifecycle rules to your bucket. Clicking that will allow you to define the rules about how long GCS should keep your cache files.
I set my lifecycle rules to delete files older than 30 days.
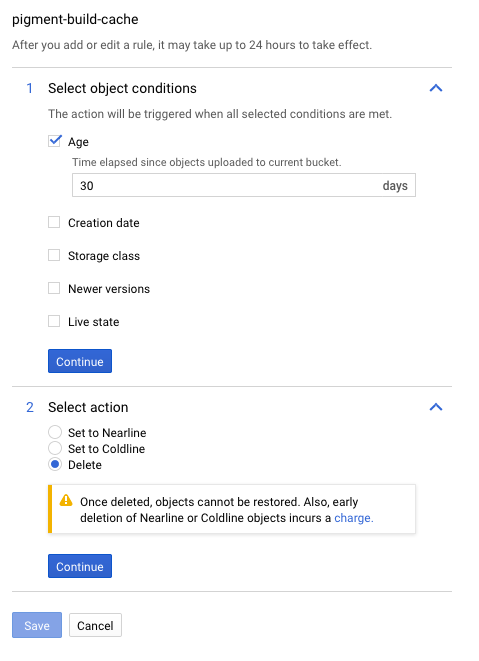
In the worst case new builds will simply have to download new dependencies, but I won’t have to pay for accumulated old cache files as my project progresses.
Conclusion⌗
While not imperative, adding a build cache to your Google Cloud Build configurations can improve your build speeds, meaning you’ll have to wait less for build feedback, and saving you money in build minutes.
While saving and restoring cache files is a seemingly simple task, it’s the custom build steps that enable such a simple build script. I encourage you to check out the builders in the Pixite Android Builders repository and submit a PR if you see any room for improvement.