Google Cloud Build for Android

As I’ve written before, I’m always on the lookout for a great continuous integration and delivery system. For a long time I used CircleCI, but in the last month or so I’ve started hitting some limitations that I needed to work around.
My requirements are pretty standard, I need something that works well with Android, requires minimal maintenance, and can handle somewhat larger projects. After a souring experience with CircleCI, and a short search for other hosted providers, I stumbled upon an early solution from Google that intrigued me.
This post is the first in a series on setting up Google Cloud Build (GCB) for Android developers.
- Introducing Google Cloud Build
- Incrementing Build Numbers
- Saving the Build Cache
My Problems with CircleCI⌗
I’ve been using CircleCI for quite some time to build Pigment. It’s worked quite well, and as a team of one the free tier worked just fine for me.
As Pigment grew I started running into issues with CircleCI’s 4 GB memory limit for its standard docker containers. Initially builds would fail here and there, but Pigment kept growing, including more and more tests and resources, and build failures became more and more frequent.
After perusing the web looking for solutions, I came across several forum posts from CircleCI employees mentioning that if you upgrade to a paid plan and submit a support ticket they’ll bump the limit for you. That seemed like an easy solution, so I got my company credit card, upgraded to a paid account and opened a support ticket. The response said that a salesperson would be in touch.
I received a message from a salesperson with a brochure explaining a system by which you purchase at least 5 seats (quite a lot for my 1 person team), then purchase credits that are consumed with build minutes in quantities depending on the size of machine you need. Doing the math revealed that building Pigment would likely cost $75-$135 per month, which is quite steep.
This felt like a bait-and-switch, and was a quite costly solution with some confusing aspects, so I decided to look elsewhere.
Google Cloud Build⌗
After a brief look at Bitrise, which seemed like a decent option, I came across Google Cloud Build (GCB). While not very prevalent in the Android community, GCB seemed quite promising for Android builds due to its Docker-based build configuration and availability of high memory build machines at great prices.
As I mentioned, GCB isn’t very prevalent in the Android community at the moment, so getting my Android builds running took a good bit of exploration and experimentation, but the result has been quite pleasant.
But First, The Price⌗
As I mentioned, Google Cloud Build has quite attractive pricing. You have your choice of three machine sizes, with the first 120 build minutes at the smallest size (the same specs as CircleCI) for free.
| CPUs | Memory | Price per build-minute |
|---|---|---|
| 1 | 3.75 GB | $0.0034 / build-minute. First 120 build minutes per day are free. |
| 8 | 7.2 GB | $0.016 / build-minute |
| 32 | 28.8 GB | $0.064 / build-minute |
For Pigment I chose to go with the mid-tier build machine with 7.2 GB of memory. At that price a 10 minute build run 100 times per month will cost $16. This is a really attractive price compared to CircleCI’s base price of $75/month.
The Basics⌗
Google Cloud Build runs on Google Cloud Platform (GCP), using cloud compute VMs, cloud storage, cloud registry and other Google Cloud Platform services. GCP is easy to work with locally using the gcloud command line tools, is highly scalable, and has some really attractive pricing.
The first step when working with GCP is to install and setup the gcloud command locally. For example, on macOS:
brew install google-cloud-sdk
gcloud init
gcloud auth login
gcloud config set project [PROJECT_ID]
Once the gcloud command is setup you can easily manage your GCP resources from the command line.
Configuration⌗
Like several other solutions, GCB is configured via a yaml file that lives alongside the code in your repo. The convention is to place your configuration in a file called cloudbuild.yaml in the root of your project directory. This is the config file that defines the build steps required to build your project, and will be unique to each project.
Also similar to other solutions, GCB runs builds in isolated Docker environments. Unlike other CI providers that I’ve used, however, each step of a GCB build uses its own Docker container, sharing data via a shared file system.
In the cloudbuild.yaml file, the main build configuration happens in a steps array. Here’s an example of a simple step:
steps:
- id: copy_build_cache
  name: 'gcr.io/cloud-builders/gsutil'
  args: ['rsync', 'gs://${_CACHE_BUCKET}/', '/build_cache']
  volumes:
  - name: 'build_cache'
    path: '/build_cache'
Docker Container per Step⌗
As I mentioned, each step in the cloudbuild.yaml file runs independently using its own Docker container. When configuring steps, the name property identifies the docker container that will be used to execute the step. The Cloud Build convention is to make the container name match the name of the command that is run when the container is launched, though that’s not required.
- name: 'gcr.io/cloud-builders/gsutil'
  args: ['rsync', 'gs://${_CACHE_BUCKET}/', '/build_cache']
In the sample above, when the gcr.io/cloud-builders/gsutil docker container is loaded it will run the gsutil command, passing the arguments from the args array.
Though the Docker containers are cached between steps so later steps that use the same container won’t have to download them again, its advantageous to make the containers for your build steps as lightweight as possible to reduce the amount of time spent downloading them.
Bring Your Own Container⌗
While GCB is based on Docker and has several useful containers built in, they don’t yet have built-in Android support, so you need to bring your own container.
Fortunately, there are third party community cloud builders, including one specifically for Android, that you can use for your own builds. The readme in the repository contains instructions to deploy an Android container to your GCP project, but here are some simplified (read: copy and pasteable) instructions:
# 1. Check out the cloud builders repository
git clone git@github.com:GoogleCloudPlatform/cloud-builders-community.git

# 2. Change to the Android builder directory
cd cloud-builders-community/android

# 3. Build and deploy the Android builder, passing in your target SDK version
gcloud builds submit --config=cloudbuild.yaml --substitutions=_ANDROID_VERSION=28

# 4. Make the required cloud storage buckets
gsutil mb gs://my-build-artifacts
gsutil mb gs://my-build-config
gsutil mb gs://my-build-cache
This will push the Android builder container to the Google Container Registry for your GCP project. While Dockerhub containers would be more convenient, GCB can download containers faster from GCR making this preferrable.
Substitution Variables⌗
Cloud Build supports user defined substitution variables for builds, which are set either via the command line arguments when running manually, or via the trigger that launches builds based on changes to your source repositories. Substitution variables start with an underscore, and can be used in your build config file to allow builds to be customized for different situations.
- name: 'gcr.io/cloud-builders/gsutil'
  args: ['rsync', 'gs://${_CACHE_BUCKET}/', '/build_cache']
In this example, the variable _CACHE_BUCKET is used to identify the Google Cloud Storage bucket to use for the build cache. When running locally, you’d supply the value via the --substitutions command line flag.
gcloud builds submit --substitutions=_CACHE_BUCKET=my-app-build-cache .
Shared Volumes⌗
Because of the isolation of each build step it can be difficult to share data between steps. The working directory (/workspace) is a default shared directory that can be used to pass information between steps.
- name: 'gcr.io/$PROJECT_ID/buildnum'
  id: setup_env
  args: ['/config/buildnum', '.buildenv']
  waitFor: ['copy_config']
  volumes:
  - name: 'config'
    path: '/config'
This example uses a custom container that I’ve created called buildnum. The gcr.io/$PROJECT_ID/buildnum container runs a buildnum script, passing in a file containing a number, and an output file. The script simply reads the number, if it exists, increments it, and writes the number back to the source file and an environment variable into the output file. This allows later steps to source the .buildenv file to get the BUILD_NUM and any other environment variables we want to add.
In addition to the shared workspace that all build steps receive, this step makes use of a shared volume called config. This is where the first copy_config step copied the remote config files to using the gsutil command earlier. Using this volumes notation allows you to add shared folders that are only used by steps that need them. In this case the only steps that include the config volume are the copy_config, setup_env and save_env steps, which copy the shared config, update the build number, and write that config back to cloud storage.
Ordering⌗
GCB supports parallel execution of build steps, which can tremendously speed up the build process. Each steps gets an optional id parameter, and you can set the waitFor array to contain any other steps that must complete for the step is executed. This allows for some complex workflows with many simultaneously executed steps, resulting in faster build times.
Running Your Builds⌗
You can run Google Cloud Builds locally for testing, manually via the command line in Google Cloud, or automatically based on Git commits.
Local Builds⌗
To run your builds locally, you first need to configure gcloud to access your GCR images, then install the gcloud-build-local component, and then you can trigger builds locally, without incurring any costs from GCP.
# 1. Setup docker credentials for GCR
gcloud components install docker-credential-gcr
docker-credential-gcr configure-docker

# 2. Install cloud-build-local
gcloud components install cloud-build-local

# 3. Run a local build
cloud-build-local --dryrun=false .
Manual Builds⌗
To trigger a build manually you simply use the gcloud utility to send a build to the Google Cloud Build environment.
gcloud builds submit .
Automatic Triggers⌗
Using the GCP web interface you can setup triggers that will watch your git repositories and trigger builds when certain conditions are met.
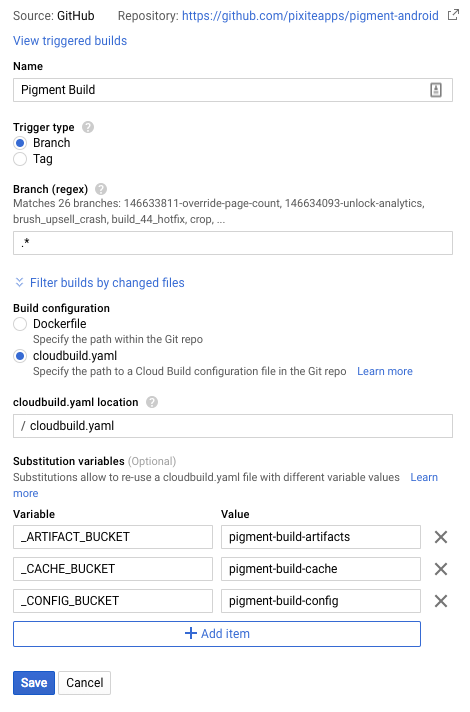
In my case I execute builds any time commit is made to any remote branch and filter certain build steps based on the branch. Depending on your branching or tagging technique you could trigger different build processes, via different cloudbuild.yaml files, for different cases.
Example⌗
Now we’ll take a look at an example cloudbuild.yaml file from the community cloud builders site, step by step.
Extract Cache⌗
To help speed up our builds it’s important to cache the build results so that they can be reused. This prevents Gradle from having to download all of the app’s dependencies every time a build is executed. To do this, we copy the contents of our cache bucket and extract the cache tarball.
- name: 'gcr.io/cloud-builders/gsutil'
  id: copy_build_cache
  # we use rsync and not cp so that this step doesn't fail the first time it's run
  args: ['rsync', 'gs://${_CACHE_BUCKET}/', '/build_cache']
  volumes:
  - name: 'build_cache'
    path: '/build_cache'

- name: 'gcr.io/$PROJECT_ID/tar'
  id: extract_build_cache
  waitFor: ['copy_build_cache']
  # This might fail the first time, but that's okay
  entrypoint: 'bash'
  args:
  - '-c'
  - |
    tar xpzf /build_cache/cache.tgz -C / || echo "No cache found."
  volumes:
  - name: 'build_cache'
    path: '/build_cache'
The second step here uses a custom container from the community cloud builders repository called tar. This container runs the tar command, but you’ll notice that I override the entrypoint in this example to run bash, instead.
This is needed because we can’t guarantee the cache.tgz file exists, as it won’t the first time the build runs, or if we remove the cache while debugging. Using a bash command allows us to handle that case with || echo "No cache found." and still continue with the build.
Build⌗
Once we have our build cache extracted, we can build our project. For this we use the custom Android Docker container that we created earlier.
#
# Build the project
#
- name: 'gcr.io/$PROJECT_ID/android:28'
  id: build
  args: ['./gradlew', 'assembleDebug']
  env:
  - 'TERM=dumb'
  - 'JAVA_TOOL_OPTIONS="-Xmx3g"'
  - 'GRADLE_USER_HOME=/build_cache/.gradle'
  - 'GRADLE_OPTS="-Dorg.gradle.daemon=false -Dorg.gradle.parallel=true -Dkotlin.incremental=false"'
  - 'BRANCH_NAME=$BRANCH_NAME'
  waitFor: ['extract_build_cache']
  volumes:
  - name: 'build_cache'
    path: '/build_cache'

#
# Save the APKs
#
- name: 'gcr.io/cloud-builders/gsutil'
  args: ['-q', 'cp', '-r', 'app/build/outputs/apk', 'gs://${_ARTIFACT_BUCKET}/$BRANCH_NAME-$BUILD_ID/']
  waitFor: ['build']
Notice that the build step is configured to wait for the extract_build_cache step. It also includes the build_cache volume so it can access the cache from previous builds.
After the build completes, we write the resulting APKs to the artifact Cloud Storage bucket.
Cleanup⌗
Finally, once the build is complete we compress the Gradle cache and wrapper and upload them to the cache Cloud Storage bucket.
# Compress the gradle build cache
- name: 'gcr.io/$PROJECT_ID/tar'
  id: compress_cache
  args: ['cpvzf', '/build_cache/cache.tgz', '/build_cache/.gradle/caches', '/build_cache/.gradle/wrapper']
  waitFor: ['build']
  volumes:
  - name: 'build_cache'
    path: '/build_cache'

# Store the build cache
- name: gcr.io/cloud-builders/gsutil
  args: ['cp', '/build_cache/cache.tgz', 'gs://${_CACHE_BUCKET}/cache.tgz']
  waitFor: ['compress_cache']
  volumes:
  - name: 'build_cache'
    path: '/build_cache'
Conclusion⌗
I’ve been working hard to get Google Cloud Build working reliably for Android builds and have been using it for the last couple of months for Pigment. With its highly configurable builds, easy management and super affordable pricing I think Cloud Build is a great CI solution.
In a future post I’ll explore how you can customize your builds to get more out of them.
Special thanks to Sebastiano Poggi, Riccardo Ciovati and Jake Wharton for reviewing this post.