Developing an Android App - Start to Finish
If you checkout the Android Development community on Google+, you’ll find a lot of people asking how to get started building an app for Android. Though quite a general question that can’t really be answered in a social post, I understand how frustrating it can be to figure out where to get started.
There are plenty of tutorials on the web about how to accomplish specific tasks, but these generally don’t cover the higher level parts of app development like version control and layout analysis.
In this series I’ll be building an entire app. At the time of this writing I haven’t written a line of code for this app, so you’ll get to work with me as I create an app, from scratch, that I will eventually submit to the Play Store.
Be sure to sign up to receive updates when new posts in the series are avialable.
A Bit About Me⌗
I’m a freelance Android developer based out of the suburbs of Chicago, Illinois, USA.
Back in 2006 I published my first Mac app, Simple Convert, while teaching English in France. It was a very simple app, but got me started in app development.
Since then, I’ve been a Mac desktop developer, a WebOS developer, a Web developer, an iOS developer, and an Android developer. I’ve worked on a lot of great projects, and seen many projects through from start to finish.
In January of 2013, I quit my mobile development job and became a freelance Android developer. Since then, I’ve built great apps for clients like Marvel Comics, American Idol, and Dell. I’ve also built my own app, Hashnote, which was featured on the Play Store in August and has garnered quite a following.
What We’ll Develop⌗
When I first decided to start this series, I wanted an app that I could open source, but would also offer many of the same requirements as apps that I write for clients. The biggest of these requirements is making web service calls, as just about every app that I’ve done for a client involves interacting with a web backend of one form or another. Other than that, I wanted all of your standard app features: displaying items in a list, viewing the details of an item, sharing data, etc.
A perfect example of many of the apps that I do for clients would be to create a new Pet Finder app. The existing app works well enough, but isn’t native and doesn’t fit the Android design, what with it’s on screen back buttons and iOS share icons.
I am not affiliated with Pet Finder in any way. My wife and I fostered dogs until we kept too many, and she still works with a rescue that actively uses Pet Finder. While I’m not affiliated with them, they do run a great service to help people find great pets in need of a home. I always support adopting animals instead of breeding as there are many wonderful animals out there already who need a home.
On to the app itself. I’m no great designer, but here are some mockups that I’ve come up with in a few hours in photoshop. This is a very simple start, but gives us an idea of what we’ll be building.
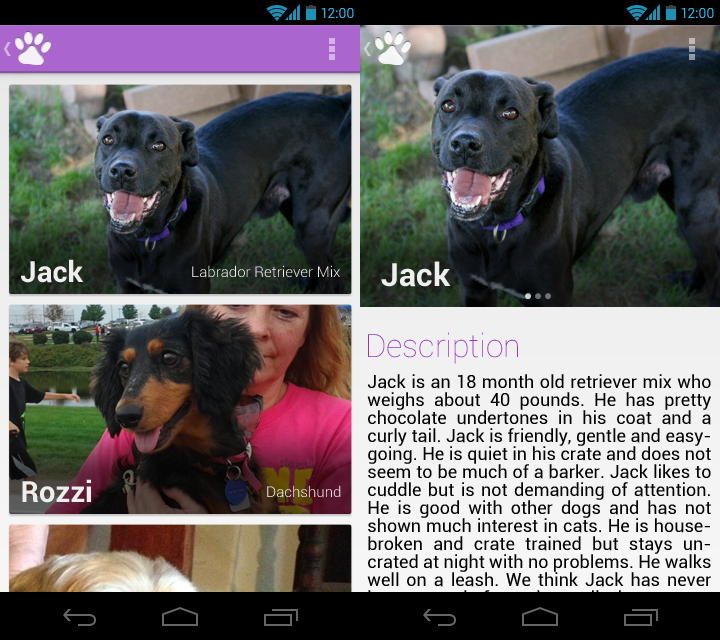
As you can see, these designs offer a visually driven app that makes it easy for you to see great pictures of animals and learn more about them. Because this app is about finding a pet, and people are often initially drawn to animals based on their look, I wanted to feature the imagery of the animals in this app.
This app will be good for learning development because it involves several of the basic building blocks of Android development including lists, custom views, web service interaction, inter-app sharing, and more. Eventually we’ll add database storage for caching and favorites, etc.
What You Can Expect⌗
Many of the skills you learn through this series will be directly transferable to your own apps. Almost every app has lists of data, detail views to show more data, local database access, and custom views. I’ll go through what I believe to be the best practices for all of those tasks.
This series is about more than just individual Android tasks, though. I’ll go through the actual process of building apps, complete with determining the best approach to solving a problem, using library projects, and using source control.
As we go along, all of the source code will be available on Github so that you can see exactly what I’m doing in the code.
What You Need To Do⌗
You need to know Java. This isn’t an introduction to programming series. I can’t possibly teach basic programming, though you will probably be able to pick up quite a bit as we go along.
If you want to follow along as we build this app, go download Android Studio and perhaps play around a little to get your feet wet.
While not a necessity, I’ve really grown to like the Genymotion Android emulator. I used to do most of my development on my full time phone because it was fast and gave me the exact experience that my users would get, but it’s really nice to have an emulator that can be set up in different configurations and not interfere with all of my existing content and user accounts. Genymotion runs on VirtualBox, and is as fast as, if not faster than, my Nexus 4, making development a breeze.
You’ll also need to have Git installed so that we can start version controlling our code immediately.
1. Tools⌗
Let’s call this first section a mini-lesson. There aren’t really actions, per-se, but I want to share with you the tools that I use in my development cycle.
Text Editor - Sublime Text 2⌗
Unlike many people my age, I still like using a text editor to make my apps. I first switched to using emacs several years ago when my 2008 Macbook could barely run Eclipse.
I felt that this might even improve my coding ability since I wouldn’t be able to rely on code completion and I was right. I didn’t have anything to automatically import classes for me, so I’ve become intimately familiar with the API structure. I also built a great habit of keeping the documentation open in a browser in one window while I code in another. So many questions I see on Stack Overflow could easily be solved if people were just more familiar with the documentation.
After using just emacs for 6 months or so, I switched to TextMate, which hasn’t be updated in years, and have since switched to Sublime Text 2.
Sublime Text is a really great editor. It has a great plugin architecture, so you definitely need to install Package Control, a plugin that makes installing plugins super easy.
It’s been a while since I’ve set mine up, but I really like the SublimeJava plugin, which gives reflection based code completion, among other niceties.
Sublime Text can take a little bit of time to get set up exacly as you like, but I’d definitely recomment checking it out.
Build System⌗
For years I used ant to build my code. This was in large part because the Android build system is based on ant, but also because I was using a text editor instead of an IDE that could build the code for me.
Since the announcement of Gradle at Google I/O, I’ve been using that to build my projects. Gradle is excellent because it combines scriptable build logic with dependency management (based on Maven).
These build systems are superior, in my opinion, to building in IDEs like Eclipse or IntelliJ because they give you easily repeatable, scriptable builds that are consistent every time. With no buttons to click or human intervention, you don’t have to worry that you forgot to check a checkbox and might have messed up your build.
Emulator⌗
For years I never used an emulator. The Android emulator that ships with the SDK is simply too slow and cumbersome to use on a day to day basis. I was always a test-on-device kind of guy.
That’s changed in the last few months when I learned about Genymotion. Genymotion is a fast - and I mean fast - Android emulator that runs on VirtualBox. They’ve done a great job of making it fast and easy to create and run the emulator without all of that lag that comes with the SDK’s emulator.
IDE⌗
As I said before, I never used an IDE…until recently. At Google I/O 2013 Google announced Android Studio, a home built Android IDE based on IntelliJ. It’s still in early preview mode, but with the IntelliJ base it’s already quite usable.
I now find myself switching between my trusty text editor and Android Studio about 50% of the time. Android Studio makes things very easy, allowing you to easily refactor code and create strings appropriately, but can also lead to sloppy code.
After years of text editor development, I got used to having to manage my imports and add my strings to my strings.xml file manually, meaning that everything was very well organized. I don’t think it added a lot of time to my build process since I got so comfortable in my process that I was quite fast. IDEs definitely lose that level of clean organization by making things easy, but it’s all a trade-off.
SCM⌗
Last but not least, I use Git for my SCM of choice. Developed by Linus Torvalds, the man behind the Linux kernel, Git is a free and open source distributed version control system that makes version control fast and easy.
Unlike central version control systems like Subversion, Git is distributed, meaning you don’t need a central server that acts as a master that everyone connects to. More importantly, Git makes branching and merging easy and painless, something that Subversion could never do.
Git allows me to work on my project and ‘branch’ off on side tasks, like fixing a little bug or trying out an idea for a new feature, without interfering with the main development of the project. When that feature or bug is complete, I can ‘merge’ that branch back into the main development branch of my repository so that everything works well together. This is extremely helpful when working on a team, where multiple people need to work on multiple tasks at once.
I don’t use a graphical interface for Git as the command line tools are extremely easy. In the next article we’ll get into the details of Git from the command line so that you have a basic idea of how to use it.
The End⌗
That’s it for this week. Check back soon to dive into managing projects with Git and getting everything set up to be a real Android developer.
Sign up for the mailing list to be notified when a new post in the series is available. I promise I won’t spam you.